Wednesday, September 20, 2023

Reinstalling AmigaOS 3.1.4 on my Amiga 2000 or "oh crap it didn't boot"

This post is about AmigaOS 3.1.4 on my Amiga 2000. AmigaOS 3.1 from Amiga works fine. However, there are a few interestingly subtle differences between 3.1 and 3.1.4 that are worth knowing about, and they stem from both OS and ROM changes that you need to be aware of.

Let's start with why I reinstalled it.


I did it a few months ago and didn't notice that I had only allocated a 10 megabyte OS partition. Oops. So, I figured I'd install it again before I started doing more work on it, and I remembered the hilarity from last time. This time, though, I took more photos to demonstrate it.

First up, the Amiga 2000. It has the 3.1 ROM from Amiga Forever. I think it doesn't include workbench.library and icons.library in the ROM due to size restrictions. So, you need to have that installed onto your boot media. AmigaOS 3.1.4 does that for you. If you use 3.1 ROMs with earlier installs of AmigaOS then you need to grab those libraries and put them in your SYS: folder yourself.

So, yes I bought some.


Then, the install disk. I have a TF536 in here and 8MB of Zorro-II RAM, hence the large amount of RAM.


Anyway, I started off by re-partitioning the drive using the HDToolBox program. It's supplied on the installation disk. Now, the 3.1.4 ROM includes a scsi.device that works with Amiga 600 style IDE, so I don't need any extra stuff to use the CF adapter on the TF536.


Oops. My boot partition is too small. Let's delete and reinitialise this.


Ok, that's better. Let's save and reboot.


Next - we reboot and reinitialise the disks with a fast format. Here's workbench:


Easy. Now, we run the installer. And, we select "Intermediary" install - or it won't correctly the detect the machine I am installing on, and thus won't install the right version of libraries that are no longer on the 3.1.4 ROM.


And now we begin.


Now after a bunch of disk swaps, it'll ask which version of hardware you have.


The first time I did this on the Amiga 2000 I did the Novice install and it asked for my Amiga 600 disks. Well, obviously I didn't have an Amiga 600.  But when I bought the disks I didn't have the modules disks either! I had to sleuth around on the internet to find them. So now I have them for my Amiga 500/1000, 1200 and 2000.

Anyway, it goes and installs the extra bits and pieces.


Finally it's done and I am told that I have a 32 bit CPU (which I do) and I need to do some extra work after reboot (which I will.)


I reboot, and here we are, basic install done. I'm warned again that I should go and install the CPU support stuff.


That's it for now. Next time (if I remember) I'll take photos of installing the CPU support toolkit, the network interface driver and then run AmigaTestKit and SysInfo to show it all together. Then after that it'll be reinstalling the network stack, and then on to music editing stuff.

Tuesday, January 24, 2023

resistance is not futile, or "why does my amiga 1000 keyboard not work?"

I gave my amiga 1000 keyboard cable to a friend so she could complete her Amiga 1000 setup. I then ordered some replacement RJ12 cables (4 wires!) to get mine working.

But they didn't.

Let's talk about why.

Firstly - yes, the cable is a RJ12 4P4C rollover cable. Ie, if you hold both connectors up next to each other and aligned the same way, the left hand pins are numbered "1-2-3-4" and the right hand connector is "4-3-2-1". Don't get this backwards or you'll end up reversing the power to the keyboard and damage stuff. It seems most phone cables are 4-wire RJ-12 and rollover pinout, but it's good to double check.


This is different to the early Macintosh keyboard - the RJ12 cable there is straight through. "1-2-3-4" goes to "1-2-3-4".

But it didn't work. I pulled apart the keyboard and started debugging it ... way too hard. The TL;DR is this. When I powered the keyboard from a 5v dedicated supply it was pulling 5v at around 125mA.

The cable I was using, straight from the bag:


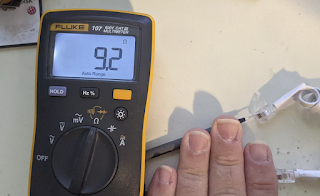
The pinout is fine, but each leg has a 40 ohm resistance. There's no way to get 125mA out of 5v at 80 ohm resistance (+5v and GND, 40 ohms each.) The voltage on the keyboard side was closer to 2v.

The one I build/crimped until it worked:


18 ohms now, and can supply ~ 250mA. It was happy with this.

So if you're looking to replace a keyboard cable with an RJ11/RJ12 from Amazon or some other store, double check the pinout, double check that there's 4 wires in the cable, and double-check the series resistance!

Monday, January 16, 2023

I got lucky with an Acorn Electron

 Ah, the Acorn Electron.


Wait, no. I never had one as a kid, I had access to a couple of BBC micros in my primary school for playing a pirate / math educational game that I have since not found online, and I've never really wanted one. Until a close friend's birthday - at which point I got them one.

And then we fell down a rabbit hole together.

So, I bought a dead Electron motherboard. Here you go.


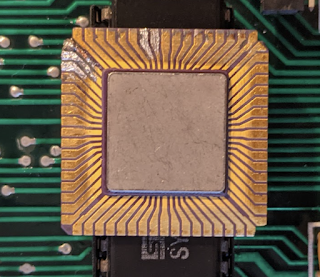
And the ULA - quite a bit of damaged tracks there.


Yes, the ULA is supposedly dead, like a lot of these Electron PCBs. My goal was to strip the PCB of components and make a replica rev4 board. However, first up, i wanted to see if i could repair it.


So, I took off the ULA and fixed up the busted pins. Some copper tape and solder did the trick. One pin was completely missing, and that was quite a challenge to get right.


Then I socketed the 6502 CPU and BASIC/OS ROM. The 6502 was already socketed but the soldering job was pretty bad. I tossed the nice machined socket because it was soldered in bad and I didn't want to clean up all the bad solder from on top of the pins, and I instead just whacked a cheap socket down to test.


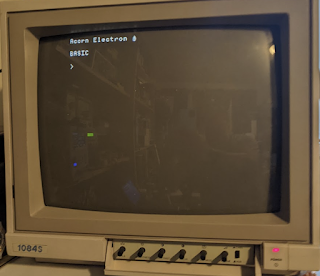
Then I powered it up.


Oops. Guess I have a working Acorn Electron. Well, I don't have a case, power supply or keyboard. Guess I'm going to have to make a keyboard for it.