Showing posts with label amiga. Show all posts

Wednesday, September 20, 2023

Reinstalling AmigaOS 3.1.4 on my Amiga 2000 or "oh crap it didn't boot"

This post is about AmigaOS 3.1.4 on my Amiga 2000. AmigaOS 3.1 from Amiga works fine. However, there are a few interestingly subtle differences between 3.1 and 3.1.4 that are worth knowing about, and they stem from both OS and ROM changes that you need to be aware of.

Let's start with why I reinstalled it.


I did it a few months ago and didn't notice that I had only allocated a 10 megabyte OS partition. Oops. So, I figured I'd install it again before I started doing more work on it, and I remembered the hilarity from last time. This time, though, I took more photos to demonstrate it.

First up, the Amiga 2000. It has the 3.1 ROM from Amiga Forever. I think it doesn't include workbench.library and icons.library in the ROM due to size restrictions. So, you need to have that installed onto your boot media. AmigaOS 3.1.4 does that for you. If you use 3.1 ROMs with earlier installs of AmigaOS then you need to grab those libraries and put them in your SYS: folder yourself.

So, yes I bought some.


Then, the install disk. I have a TF536 in here and 8MB of Zorro-II RAM, hence the large amount of RAM.


Anyway, I started off by re-partitioning the drive using the HDToolBox program. It's supplied on the installation disk. Now, the 3.1.4 ROM includes a scsi.device that works with Amiga 600 style IDE, so I don't need any extra stuff to use the CF adapter on the TF536.


Oops. My boot partition is too small. Let's delete and reinitialise this.


Ok, that's better. Let's save and reboot.


Next - we reboot and reinitialise the disks with a fast format. Here's workbench:


Easy. Now, we run the installer. And, we select "Intermediary" install - or it won't correctly the detect the machine I am installing on, and thus won't install the right version of libraries that are no longer on the 3.1.4 ROM.


And now we begin.


Now after a bunch of disk swaps, it'll ask which version of hardware you have.


The first time I did this on the Amiga 2000 I did the Novice install and it asked for my Amiga 600 disks. Well, obviously I didn't have an Amiga 600.  But when I bought the disks I didn't have the modules disks either! I had to sleuth around on the internet to find them. So now I have them for my Amiga 500/1000, 1200 and 2000.

Anyway, it goes and installs the extra bits and pieces.


Finally it's done and I am told that I have a 32 bit CPU (which I do) and I need to do some extra work after reboot (which I will.)


I reboot, and here we are, basic install done. I'm warned again that I should go and install the CPU support stuff.


That's it for now. Next time (if I remember) I'll take photos of installing the CPU support toolkit, the network interface driver and then run AmigaTestKit and SysInfo to show it all together. Then after that it'll be reinstalling the network stack, and then on to music editing stuff.

Tuesday, January 24, 2023

resistance is not futile, or "why does my amiga 1000 keyboard not work?"

I gave my amiga 1000 keyboard cable to a friend so she could complete her Amiga 1000 setup. I then ordered some replacement RJ12 cables (4 wires!) to get mine working.

But they didn't.

Let's talk about why.

Firstly - yes, the cable is a RJ12 4P4C rollover cable. Ie, if you hold both connectors up next to each other and aligned the same way, the left hand pins are numbered "1-2-3-4" and the right hand connector is "4-3-2-1". Don't get this backwards or you'll end up reversing the power to the keyboard and damage stuff. It seems most phone cables are 4-wire RJ-12 and rollover pinout, but it's good to double check.


This is different to the early Macintosh keyboard - the RJ12 cable there is straight through. "1-2-3-4" goes to "1-2-3-4".

But it didn't work. I pulled apart the keyboard and started debugging it ... way too hard. The TL;DR is this. When I powered the keyboard from a 5v dedicated supply it was pulling 5v at around 125mA.

The cable I was using, straight from the bag:


The pinout is fine, but each leg has a 40 ohm resistance. There's no way to get 125mA out of 5v at 80 ohm resistance (+5v and GND, 40 ohms each.) The voltage on the keyboard side was closer to 2v.

The one I build/crimped until it worked:


18 ohms now, and can supply ~ 250mA. It was happy with this.

So if you're looking to replace a keyboard cable with an RJ11/RJ12 from Amazon or some other store, double check the pinout, double check that there's 4 wires in the cable, and double-check the series resistance!

Sunday, December 11, 2022

Who's the /BOSS on the Amiga 2000 ?

 I slipped and bought a TF536 to put into my Amiga 2000. TL;DR is it's now running, but it took a bit of fiddling to get there. When I was last getting it going I noticed it didn't like any Zorro-II RAM in there, so I simply disabled it (it wouldn't do much) and left it alone. The storage card I'm using (a GVP SCSI job) doesn't do DMA to Zorro-II RAM - it does DMA to/from a 64k IO/RAM window which then the driver memcpy()'s out.

Whacking it in with the CPU riser I got from amigastore.eu booted up fine as long as no other RAM cards were installed.


If I installed my storage card or any zorro-II RAM cards it just hung. Not fun.

So then I thought, wait a sec. It's going into the CPU expansion slot, not the CPU socket. And there's this thing called /BOSS which accelerator cards in the CPU expansion slot should assert if they want the DMA and some other signals routed to them rather than the main CPU socket.

So, I grabbed a different one.


This one has a jumper for /BOSS to keep it enabled, and also has the FC0..FC2 pins (indicating the CPU state) also routed.

I plugged this in and bam.


(note I didn't leave the 2MB RAM enabled on the storage card after this test; until I'm ready to screw around with programming stuff that explicitly wants to test Zorro-II/Zorro-III space RAM, I'll leave it off.)

I also tested it with an 8MB Zorro-II RAM expansion (the ZoRAM card that's available on the internet) and it also works fine.

Anyway TL;DR is - don't forget to ensure your accelerator card installation on an Amiga 2000 has /BOSS asserted, or a bunch of DMA/Zorro-II lines won't get routed to the CPU expansion slot and things won't work right.

Tuesday, December 6, 2022

damnit i slipped and (mostly) built an amiga 500

EDIT - the original article has an image of the PCB with the floppy power connector mounted the WRONG WAY. 

This is the INCORRECT WAY. Do NOT do it this way!


TL;DR - I'm half way through building an Amiga 500+ replica. The goal:

  • New PCB
  • New clear case
  • Actual floppy drive!
  • TF534 Accelerator, yes I am interested in FPU stuff for reasons and yes I'm sad about the 4MB of RAM but I'll make do - terriblefire does a great job designing/building/debugging these accelerators and I'm glad they exist!
  • ECS Denise, also for reasons
  • 2MB chip RAM and some slow RAM too because again why not
  • 3.x ROMs
The challenges!

  • I need a keyboard for it, but my "donor" machines, like my "donor radios", all now work. Hilarious.
  • The Amiga 500+ board wasn't well documented for assembly, until I looked. Closer.
  • Well, the 8375 Agnus I acquired is a PAL one, so I guess I'm building a PAL Amiga 500+. (Which is fine as you can switch it in software after boot, but STILL.)
  • Oh yeah, floppy drives. Ugh.
Ok, so the PCB. I picked it up from https://www.tindie.com/products/bobsbits/a500-amiga-500-replica-pcb/ . There's a link with the component list, and I got them all with some hunting around. I wish I had a "dead-ish" donor Amiga 500 of suitable vintage to grab parts from, but again, all my machines now work. Ha.

Here's it assembled. Well, mostly.


I still have some connectors and the RTC to add. Yes, it's a 2.x workbench ROM. Yes, it boots to ROM fine.

Now, what do I do about the jumpers? The instructions don't have the Amiga 500+ rev8 PCB jumper descriptions. Ok, they're in the service manuals. And yeah I can read the schematic, but I wanted to be lazy.

Ok, so I started to look at it. I definitely wanted the 1MB/2MB option. I wanted the expansion RAM to show up in chip RAM to start with. Ok, ok. But, guess what. The PCB has them already kinda done.

Here, look closely.


JP3 is already done for us. (For 1MB/2MB I need to have them horizontally jumpered, not vertically.)

And for JP2:

It turns out the two bottom pins are already joined. I'd have to cut the track to start using the expansion RAM slot as slow RAM (in $C00000) or if/when I fit a Gary Adapter / RAM expansion add-on.

Finally, the case is here and the TF534 is installed and boots up to ROM fine.


I'll finish the installation once the sockets arrive - and yes I may go and borrow my rev5 amiga 500 keyboard and Gotek floppy drive emulator until I get suitable replacements. Or, maybe just design an Amiga 500 keyboard drop-in replacement with cheap cherry MX style switches. Why not.

Sunday, September 25, 2022

Installing a kickstart ROM adapter in my Amiga 1000, or "Nothing works, and nothing makes sense"

The Amiga 1000 is a slick looking machine. It however loads its ROM from floppy disk. The Wikipedia Article on the Amiga 1000 explains why.

I wanted to put a Kickstart 1.3 ROM in my Amiga 1000. There are adapters out there you can build and install. I chose one, followed the instructions, and it didn't work.

After a whole lot of digging I finally got it working and now I'm documenting what hilarity I found.

I started with this one from the amiga community. The PCB manufacturing files are available on PCBWAY as a shared project. So, I got the board made, did the board mods on my Amiga 1000, and set it up. No bueno.

Let's go over the mods first before I explain why it didn't work.

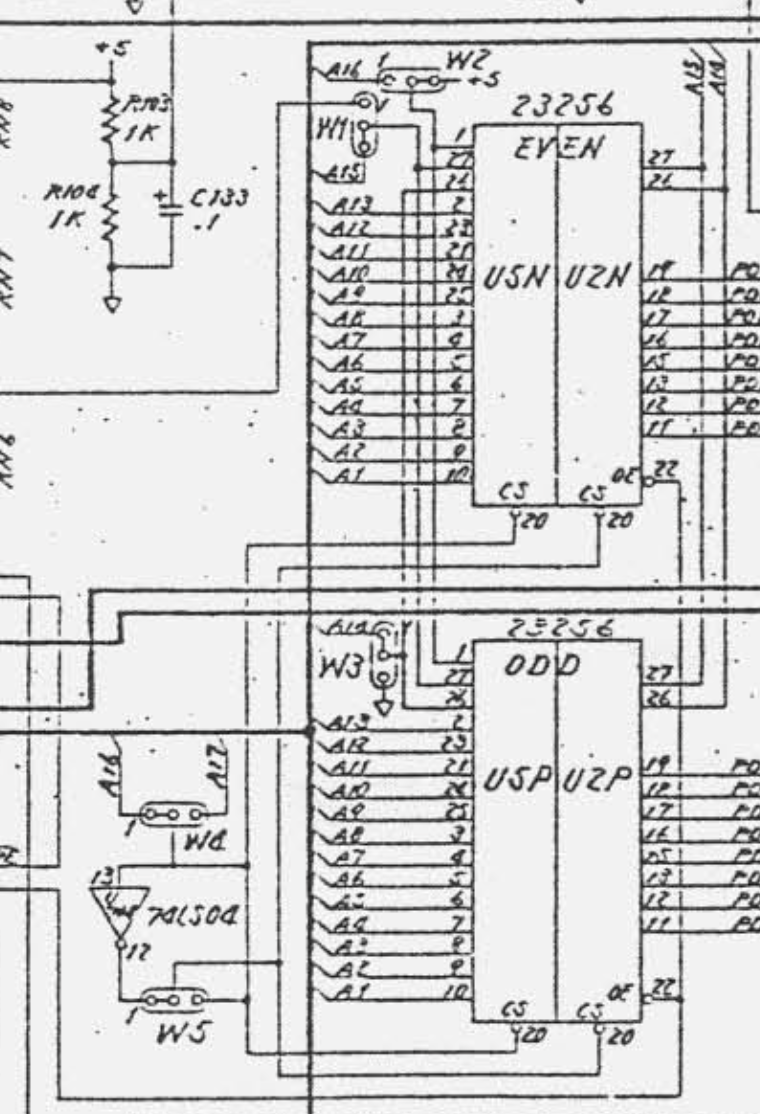
First up, the Amiga 1000 has a pair of small ROMs (lower and upper 8 bits of the data bus) to bootstrap the ROM image from floppy disk, throw it into the write once memory store and then kick it appropriately to take over the ROM memory address range. The ROM address range is $F80000 -> $FFFFFF - a 512KiB region. But, this ROM isn't that big at all.

The schematic calls out what's going on pretty clearly. This is for the early revision Amiga 1000, with the U5N / U5P ROMs populated.


The /OE lines (pin 22) go to /ROM01 on the PALs, which (among other things) enables the ROMs only when the write-once memory store isn't active and we're in the ROM region.

But look at the other bits going on.

First, pin 1 is going to +5 volts, instead of A16. Pin 27 is going to A15 instead of .. the processor R/W pin? Weird. Anyway, let's look at these ROMs.

First confusing thing here - the ROMs addressing starts from A0 to A14. The 68000 bus however doesn't have an A0 - it's A1 to A23, and then there's upper/lower byte select lines. So, this ROM A0 is the CPU bus A1, the ROM A1 is CPU bus A2, etc.

Pin 1 is NC - it'd be ROM A15 on a 64k x 8 ROM. Ie, Amiga/68000 A16. And pin 27 is ROM 14, Amiga/68000 A15. That makes sense.

What's happening with the OTHER /CS line though?

On U5N/U2N, the /CS2 lines in the schematic to go W2 and W5. The intention looks to be whether A16 or A17 acts as a chip select line to enable either the lower or upper set of ROMs. If you wanted 32KiB ROMs then you'd want A16 to be the /CS2 control. If you wanted 64KiB ROMs then you'd want A17 to be the /CS2 control.

In theory, if everything is wired up fine, this means you can fit 256KiB of ROMs by fitting four 64KiB ROMs and jumpering things appropriately. You'd want:

  • W2 to be CPU A16
  • W1 to be CPU A15
  • W3 to be CPU A14
  • W4 to be CPU A17
  • W5 to go via the 74LS04 to invert A17 as the /CS2 line, so either the U5N/U5P is enabled, or the U2N/U2P is enabled.
However, this just plainly didn't match what's on my board. After trying a couple times to do the whole mod, I started to question whether the PCB matched the schematic. Hint, it ... didn't.

Here's what the PCB layout looks like, front:


and back:


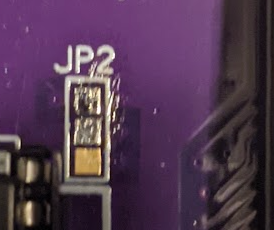
You can see where you need to cut W1, W2, W3, W4 (and W5, but I didn't) to turn it into a selectable jumper set.

So, I buzzed out both the ROM board and the Amiga 1000 board to see what was going on. And what I found was ... pretty amusing. I removed all four jumpers and:

  • 68000 D0..D15 are OK
  • 68000 A1..A15 are OK
  • 68000 A16, A17 - not OK!
  • 68000 A18 - OK!
The A18 line made it to the ROM board via one of the wires soldered to the write-once RAM board. The ROM /CS line was soldered to the write-once RAM board as well.

Then I went digging on the ROM board. Let's use ROM numbering now, starting at A0 (cause that's how my notes went.) A0 to A8, A9, A10, A11, A13 used the "even" ROM address lines. A15 used pin 1 on the odd side. A16 on the kickstart ROM mapped to /CS2 on the odd side. A17 on the kickstart ROM mapped to the 4 pin connector and over to the write-once memory board. Same with the ROM /CS line.

So, I had some culprits.
  • /CS2 maps to ROM A16 which is Amiga/68000 A17. Ok, so maybe I can play with that on the Amiga side using W4, right?
  • Where the heck was Amiga/68000 A16 being routed?
  • ROM A15 on odd pin 1 should be controlled by W2, either being Amiga/68000 A16, or +5v, right?
Ok, so then I started buzzing the jumpers and finding out where they went. I then made my first discovery - the trace to ROM /CS2 ? It was tied to CPU A16. No matter what. So, I couldn't flip W4 to the alternate configuration - that shorted ROM /CS2 and CPU A16 to CPU A17. Which means I could not use the /CS2 pin on the ROM adapter, I had to run a separate wire to connect it to CPU A17 and have it end up on the right ROM pin!

Ok, so. I did that. I routed ROM A16 to the middle pin of W4 and ROM A17 to the right hand pin of W4. The rest of the jumpers mirrored the original configuration of the Amiga 1000.

.. but then, nothing. Ok. I went looking at what else could be missing. Then I found the fun reason - the kickstart adapter PCB didn't at all hook up the /BYTE control line to anything. It was just floating. This is problematic for things like DiagROM or the flash based ROM replacements which expect /BYTE to be set correctly for word access. So, I soldered a wire to +5v so it would be tied high and enable word mode.

Success! The ROM booted to a green screen! Ew.

So, in went the Amiga DiagROM. And DiagROM booted! And gave me a lovely screen of horizontal bars! Now, they're supposed to hint at which data line could be busted, but they were all light green and I was told by the author that it may also be not finding enough chip RAM. He suggested a 5V UART directly attached to the UART TX pin on Paula, and that's what I did.

And he was right - it was only detecting 64k of chip RAM.

I was very confused. I slept on it. The next day I fired up the DiagROM again but with some fast RAM attached, so DiagROM would actually start all the way. Then I used the memory editor to edit regions of chip RAM to see how it behaved. The RAM behaved .. fine? Until I looked a bit closer.

The first 64KiB of chip RAM was mirrored in the second.

The third 64KiB of chip RAM was mirrored in the fourth.

etc.

That told me A16 was stuck. But, it couldn't be the whole of A16, or the ROM code wouldn't get very far. No, it was something to do with RAM. Or, to be clear, the address decoding of chip RAM. I had a late night idea that day- what if the bit wasn't stuck, but it .. wasn't being routed?

So I buzzed the chip RAM address bus, here:


These go up to the write-once memory board, so I buzzed A16 on pin 10 of that chip and ... bam. Nothing. No connection to CPU A16.

Then I buzzed the jumpers. And I found the last thing that super surprised me.

The left hand side of W4, that was connected to the CPU A16 and /CS2 line? That pin goes to the RAM A16 line.

And so does the W2 jumper. The left hand side of W2 is RAM A16. The middle is ROM A16. The right is +5v.

So, the PCB routing seems hella wrong there.

So, after removing two pins from my adapter, routing /CS and A17 directly out as wires for A16 and A17, and hooking them up as shown, DiagROM started and all chip RAM was found. When I flipped out the Diag ROM for a Kickstart 1.3 ROM, it also worked fine.


As you can see, the jumper positions are basically where they were for an unmodified board, except that I'm manually grabbing the Amiga/68000 A16/A17 lines and running them to the ROM adapter (and those pins are removed from both odd/even connectors!)

Well, that was fun. "Fun". I have a second Amiga 1000 here, I may choose a different path for its upgrades.

Monday, May 23, 2022

Getting new simgen backdrops on my amiga 500

This'll be nice and short.

I wanted to add some new backgrounds to simgen, which is a hack on Amiga Workbench 1.3 setups which allows for a 1 or 2 bpp (2 or 4 colour) background image.

Part of it is figuring out how to convert to a suitably formatted IFF (interchange file format) for an Amiga. I didn't want to install photoshop or do photo conversion on the Amiga. Yeah I'm lazy.

So the TL;DR is:

  • https://github.com/Pixinn/rgb2amiga - rgb2amiga converts images to IFF using Imagemagick 6. Yes, make sure you install ImageMagick 6 as the latest version API has changed enough for this to fail compilation.
  • Make sure you resize the original image to a suitable resolution for your desktop - I'm using 640x200, and I'll play with 640x256 later.
  • Make sure you also realise the output screen is 4:3, so crop appropriately.
  • Run the program, and see what happens.
Here's the input and output images:


Yes I know I didn't crop it to the right aspect ratio; I just wanted to see if it worked before I spun cycles on optimising things.


Thursday, May 19, 2022

It took me WAY too long to get this gotek to work...

 The short version - when you buy an actual OG Gotek with the OG Gotek firmware, it doesn't work in any convenient way that is documented on any of the retro computing sites, because you DEFINITELY need to flash it with different firmware.

Ok, so the less short version!

I picked up a busted Amiga 500 for free to help repair an Amstrad CPC464 for someone. It had a busted ROM socket, busted RAM and some other random crap that I needed to fix. Oh and 50 of the keys were not working, and the key membrane was broken!

So everything above is fixed - and I still need to fix the RTC in the A501 memory expansion - but now I need to get it to boot. And I don't have a spare floppy drive for this.

But I did have a Gotek - I bought it for the IBM PC stuff, but I ended up bootstrapping it using USB 3.5 inch floppy drives.

.. and it didn't work. And I didn't understand why.

So, the summary.

I wanted to flash the FlashFloppy Gotek stuff from https://github.com/keirf/flashfloppy/wiki/Firmware-Programming. Easy peasy. Get a UART hooked up and connect to FreeBSD.

Didn't work. Welp.

After reading around I found that someone tried at 9600, because it just wouldn't work faster.

I did that and well now it does. It's quite possible if I added the 10k pull-ups mentioned on the flashfloppy hardware mods section that I'd have more luck.


.. and flashing it from FreeBSD:


Easy.

Ok, next. Hooking it up. Set it to be device 0, remove another config jumper. Easy. Also, apparently the pinout is .. reversed on the amiga 500? In any case, pay super close attention to the orientation of the floppy drive connectors.


Anyway. Now it works. I then followed the installation instructions for a USB stick and whacked Workbench 1.3 images on - and now it boots fine into workbench 1.3. I've ordered a replacement mounting frame for the Gotek board so it can sit in with the case closed - but for now the machine works.

Well, besides the RTC. That's next. Ugh.

Saturday, May 14, 2022

Amiga 1200 - Kickstart 3.1.4 upgrade, but not upgrading to AmigaOS 3.1

 So I splurged a couple bucks on the updated AmigaOS 3.1.4 from Hyperion. It came with both the ROMs and AmigaOS. Now, I have 3.1 installed already, and I wanted to just drop in the ROMs.

It almost worked.

It looks like they moved some libraries from the ROM out to disk/RAM in order to make space.


So I figured they were on one of the installation disks, and....

Easy peasy. I copied icons.library and workbench.library to my system partition and rebooted. All good!


It's really quite slick how Kickstart ROMs are basically a bootloader and then a whole bunch of libraries, some of which form the core OS and some are actually just libraries. I'm sad this concept didn't show up elsewhere.


Monday, February 7, 2022

At least cross compiling for the Amiga 500 is easier than the 16 bit DOS mode PC stuff

I wanted to hack on Amigaterm (https://aminet.net/package/comm/term/amigaterm) a bit, but I found out that someone already had done that (https://aminet.net/package/comm/term/amigaterm_enh). They fixed some bugs and added speeds above 9600 baud - 19200 works fine on the Amiga 500, and 38400 works fine on the Amiga 1200.

But I wanted to add a couple more things - play with what Amiga calls "serial hardware flow control" (which is .. not quite what you expect...) and fix up xmodem receive to allow it to truncate data at a particular file size. Without the truncation option the written file is a multiple of the xmodem block size (128 bytes) which results in binaries you can't actually run.

Anyway.

There's a very nicely put together build framework targeting m68k Amiga at https://github.com/bebbo/amiga-gcc . I haven't built it yet on FreeBSD - just Ubuntu Linux and MacOS/X. Then I wanted to get amigaterm to compile for workbench 1.3 as that's what is on my Amiga 500. It turns out that's quite easy - you just need to use the right command line option (-mcrt=nix13), but you need to be sure that you're not trying to use library versions and functions that are later than what 1.3 supports.

This did trip me up - there's a ChangeFileSize() in later OS versions (4.0 I think?) that isn't in 1.3, but there is SetFileSize() in 1.3 (library version 36). I ended up opting for just not writing out the data instead of writing it out and truncating.

Now that this is working I think I'll go and see if using 128 byte receive data buffers when receiving xmodem packets works better than byte at a time. I need to go and understand how they handled timeouts so I don't end up waiting forever for data to show up. That may end up speeding up receive transfers a little.

What I'd really like to do is bring over or write very small zmodem receive library to really speed things up to make it less painful to transfer the 880 kilobyte disk images (ADF). That'll make bootstrapping things less painful in the future.

Next up is fixobj. The source for that is on the fish-010 disk so I modified it to compile here. It's hard-coded to search the last 128 bytes for the end of an executable binary, which matches the normal 128 byte xmodem block size.

Finally, I've put them both in github here - https://github.com/erikarn/amiga-code .

Saturday, February 5, 2022

Getting stuff onto the Amiga 500, or "holy crap please include bootstrapping serial file transfer utilities in your OS"

Yes, I know I'm ranting about 1980s OSes, but to be quite frank, modern OSes on a variety of hardware still have a similar problem.

Wait, what do I mean you ask? Surely you will always have ethernet/wifi/USB available? I almost started writing a bit on that here given I end up working behind the scenes on modern hardware and a LOT has to be working before you can talk over the network or, heck, even boot your device. But I'll leave that for another day.

This is a similar thing to what I found in a previous blog post about boot-strapping an old PC/AT before I had useful media (read: disks and other working machines.) It's doubly tricky for the Amiga because of it's non-standard floppy disk format that can't be easily read on PCs, let alone written to. You need to have another Amiga, or some modern multi-format disk interface like the Catweasel. I lucked out and at least got working Workbench 1.3 Main and Extra disks with the Amiga 1000 I picked up - but no working Kickstart disk, hence why I'm working with the Amiga 500 right now.

Anyway, the goal of this is to get the following to work:

  • Figure out how to transfer a simple program to get a single binary over in a useful way;
  • Transfer a small enough program over to do xmodem/ymodem/zmodem;
  • Use that to bootstrap the tools to write disk image files to an Amiga 880K disk; and
  • Also write out a working Kickstart 1.3 disk for my Amiga 1000.
This is... surprisingly annoying to do.

Firstly, how to get the initial files over. Workbench didn't come with a file transfer program, even with AmigaDOS. xmodem was around in the late 70s so it could've been used. Oh well. Luckily the Extras disk includes AmigaBASIC which can speak to both the disk and the serial port. And there are guides out there for how to write a simple non-error-checking binary receive program - I used this one.

I also needed to make a null modem cable up. Now, the Amiga 500/1000 used some of the RS-232 port pins for things other than ground, so it's best you make one of your own. Here's what I used for my Amiga 500.


The Amiga 1000 uses a reversed serial port, and I will figure out that particular hilarity once I get it booting with Kickstart.

However! Not everything was, err, well documented. I remember Amiga stuff in the 90s, but not THAT well.

First up - the receive.bas program in the above link doesn't at all set the serial parameters. So before you start it you need to run the Serial preferences program and configure it up. It also assumes that you're using 1024 byte buffers, so you need to do the following:
  • Set the speed - I used 9600, it's somewhat reliable here;
  • 8/N/1, which is already setup;
  • Buffer size 1024 bytes, not 512 bytes;
  • Hardware flow control!
Then yes, on the linux side I did the same (stty 9600 -parenb cs8 crtscts -ixon -ixoff raw iutf8 -F /dev/ttyUSB0).

Ok, then running the program. It's best you get the data going into the ram disk, so set your file target as RAM:filename. Easy.

Except the block size thing. Apparently with the way AmigaBasic speaks to the serial driver the transfers have to be in block sized blocks, not just the file size. So you need to pad the file you're sending. The receive.bas program will write out the correct length for you.

I did something like this:

  • dd if=file bs=1024 conv=sync > /dev/ttyUSB0
That padded it correctly and .. well, after a few attempts I can get a ~ 20k binary to transfer OK.

Then comes the fun part, what to transfer. I started by transferring lharc. However, apparently the later versions don't work with Workbench 1.3! I had to use https://aminet.net/package/util/arc/LhA_e138 .

It took a few goes, but yes, I got a working lharc tool on the floppy disk.

Next up is transferring something less terrible to transfer files with. A lot of things are lha'ed, which is why I spent a lot of time trying to get lha to transfer. Next time I won't, I'll unpack them on the linux sending host and send the binaries.

I needed a small transfer program to work on Workbench 1.3. I found https://aminet.net/package/comm/term/amigaterm . It's small, it runs on Workbench 1.3 and it has xmodem support. Nice!

However! It's xmodem support doesn't ask for the receive file size, so it rounds it up to the nearest block size. No! Things like lha then don't seem to work right and binaries certainly don't run.

Ok, so how'd they do it in the 80s/90s? It turns out there's a little utility called "fixobj" which tries to find the actual end of a binary object inside a file and truncates it there. I unpacked https://aminet.net/package/misc/fish/fish-0010 and grabbed the small binary from it. Now I can transfer individual programs, like https://aminet.net/package/disk/misc/adf2disk11, to write out an ADF image to disk.

So, that's transferring right now upstairs via xmodem at 9600. Yeah it'll take a while. Luckily 901120  bytes (the size of an ADF image) is exactly 7040 blocks of 128 bytes each, which is what xmodem is using. Thus I should be OK without having to truncate stuff.

Once that's done I can start transferring things to get the IDE disk add-on I have here booting, and I can setup the rest of this Amiga 500 to do fun things.

What I think would've made this easier?
  • Some tiny xmodem program that can be transferred over serial relatively quickly, and can receive exact file sizes (ie it'll truncate the last block if needs be)
  • A program to actually truncate a file at a given offset so you can use amigaterm as-is to transfer files slowly but reliably, and then just manually truncate it to where it needs to be in order to use it.
  • ... and then some less tiny but working zmodem program that'll work with Workbench 1.3 to get files on and off the thing.
In any case I'm hoping by tonight I'll have this thing writing out ADF disk images OK albeit slowly, and I'll see if I can get zmodem working on something faster like 19200 baud.