EDIT - the original article has an image of the PCB with the floppy power connector mounted the WRONG WAY.
This is the INCORRECT WAY. Do NOT do it this way!

TL;DR - I'm half way through building an Amiga 500+ replica. The goal:
- New PCB
- New clear case
- Actual floppy drive!
- TF534 Accelerator, yes I am interested in FPU stuff for reasons and yes I'm sad about the 4MB of RAM but I'll make do - terriblefire does a great job designing/building/debugging these accelerators and I'm glad they exist!
- ECS Denise, also for reasons
- 2MB chip RAM and some slow RAM too because again why not
- 3.x ROMs
The challenges!
- I need a keyboard for it, but my "donor" machines, like my "donor radios", all now work. Hilarious.
- The Amiga 500+ board wasn't well documented for assembly, until I looked. Closer.
- Well, the 8375 Agnus I acquired is a PAL one, so I guess I'm building a PAL Amiga 500+. (Which is fine as you can switch it in software after boot, but STILL.)
- Oh yeah, floppy drives. Ugh.
Ok, so the PCB. I picked it up from https://www.tindie.com/products/bobsbits/a500-amiga-500-replica-pcb/ . There's a link with the component list, and I got them all with some hunting around. I wish I had a "dead-ish" donor Amiga 500 of suitable vintage to grab parts from, but again, all my machines now work. Ha.
Here's it assembled. Well, mostly.

I still have some connectors and the RTC to add. Yes, it's a 2.x workbench ROM. Yes, it boots to ROM fine.
Now, what do I do about the jumpers? The instructions don't have the Amiga 500+ rev8 PCB jumper descriptions. Ok, they're in the service manuals. And yeah I can read the schematic, but I wanted to be lazy.

Ok, so I started to look at it. I definitely wanted the 1MB/2MB option. I wanted the expansion RAM to show up in chip RAM to start with. Ok, ok. But, guess what. The PCB has them already kinda done.
Here, look closely.

JP3 is already done for us. (For 1MB/2MB I need to have them horizontally jumpered, not vertically.)
And for JP2:
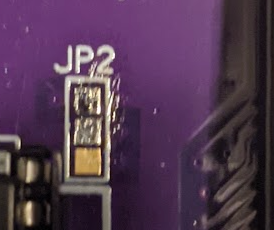
It turns out the two bottom pins are already joined. I'd have to cut the track to start using the expansion RAM slot as slow RAM (in $C00000) or if/when I fit a Gary Adapter / RAM expansion add-on.
Finally, the case is here and the TF534 is installed and boots up to ROM fine.

I'll finish the installation once the sockets arrive - and yes I may go and borrow my rev5 amiga 500 keyboard and Gotek floppy drive emulator until I get suitable replacements. Or, maybe just design an Amiga 500 keyboard drop-in replacement with cheap cherry MX style switches. Why not.
Bringing back happy memories of my upgrade from a ZX Spectrum to an Amiga 500 in the late 80s. Good luck with the project.
ReplyDeleteIndeed. I went from a Spectrum +3 to an Amiga 500. Christmas 1989. Happy memories
DeleteAh superb, yes exactly same for me - went from a Spectrum 48k to a +3, then the Amiga 500, followed by a 1200. Such great machines.
Delete